
How to replace elastics in older style Magicall Nappies
In 2013 we redesigned the Magicall range to the Award Winning nappies you see on our current site. Prior to then the Magicalls (All in One & Multi-Fit) had different zig-zag elastics around the legs & a ruffle above the back waist as you can see in the pics below. They were great nappies, but fair bit bulkier than the current designs and these can still be purchased on the second hand market occasionally. Quite often these older nappies styles, just need new elastics and they will keep on working perfectly fine, so here is a basic tutorial on how to replace the back waist elastics & leg elastics on the older style Magicalls All-In-One & Magicall Multifits.
Supplied Needed
- Elastics, roughly 30 cm per nappy (usually Braided Elastic 5-6mm for legs & 20-25 mm for back waist)
- Thread,
- Scissors
- 6x safety pins
- Tape measure
- Sewing Machine (preferred) or needle and thread
- Tweezers
Part 1 Inserting the Elastic
- Lay nappy cover so that the coloured shell is facing the table and you are looking at the white inside of the nappy.
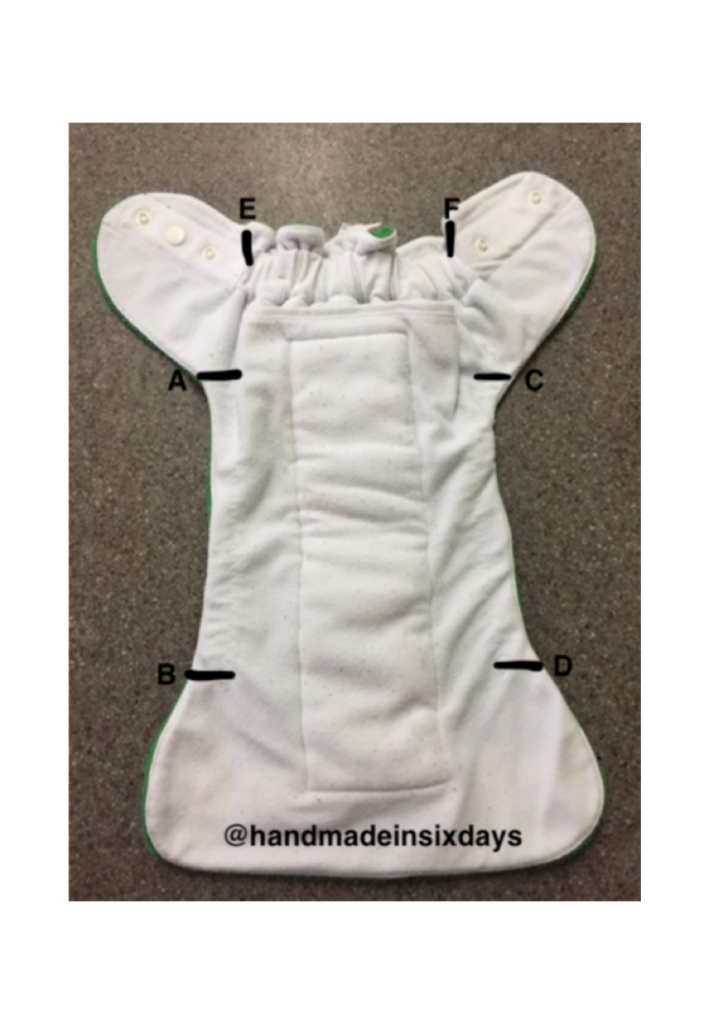
- Identify Points A & B on the cover, and measure the distance between them, ie 15cm between Point A & B.
- We are now going to half that measurement, and cut the elastic to that measurement, ie 7.5cm of elastic cut.
- Pin each end of the elastic with a safety pin. The pins will help feed the elastic through the nappy and also act as an anchor so it Is less likely to pull all the way through.
- Next, make two small cuts at Point A & B. The cut is only on the inside white material and not onto the colourful outer-shell. The hole only needs to be the size of the safety pin head.
- Feed the elastic with the safety pins through the holes
- Repeat this Part 1 process with Point C & D, and E & F
** You can remove the old elastic when you cut open at point A & B. use some tweezers and skinny scissors to remove if possible. If you can’t remove, don’t worry just leave them inside.
Part 2 – Securing the Elastic
To secure the elastic I highly recommend a sewing machine. The elastic can be secured with hand sewing using a needle and thread but it is a lot less secure, more time consuming and very frustrating when you realise that you did not secure it enough and you feel it pop away and you have to repeat Part 1 again.
Sewing Machine
- Thread up the sewing machine with a colour of thread that you are happy being visible with the outside shell of the nappy. Places like Spotlight have a large selection of threads, making it possible to get very nearly or the exact right colour.
- Sitting at the sewing machine, place Point A under the foot.
- Make sure at least 0.5cm will be caught within the stitch, in case the elastic frays slightly. Begin sewing a Straight Stitch.
- Go over the stitch several times to ensure that the elastic is secured.
- Use a pair of tweezers to tuck the tail of the elastic back inside the hole you cut in Part 1, Step 5. This makes the finished product look nicer, but not essential for use.
- I now adjust my machine settings to ZigZag, and zigzag the hole closed. Again, not essential but I would rather the hole closed so something cannot get inside.
- Repeat this process with Point B, being very careful not to let go of the elastic. If you do let go of the elastic you have to work with tweezers and patience to find the end again.
- Set the machine to Straight Stitch. Pull new elastic tight and locate the half way point. Stitch at this point, to avoid the elastic moving away from its needed position.
- Repeat this Step 2 process with Point C & D, and E & F
Hand Sewing
- Thread needle with colour that will be visible on the outside shell. Places like Spotlight have a large selection of threads, making it possible to get very nearly or the exact right colour.
- Make sure at least 0.5cm will be caught within the stitch, in case the elastic frays slightly. Begin sewing.
- Go over the stitch many times to ensure that the elastic is secured.
- Use a pair of tweezers to tuck the tail of the elastic back inside the hole you cut in Part 1, Step 5. This makes the finished product look nicer, but not essential for use.
- Once the tail is tucked back inside the cover, close the hole using your needle and thread. Again, not essential but I would rather the hole closed so something cannot get inside.
- Repeat this process with Point B, being very careful not to let go of the elastic. If you do let go of the elastic you have to work with tweezers and patience to find the end again.
- Pull new elastic tight and locate the half way point. Stitch the elastic securely at this point, to avoid the elastic moving away from its needed position.
- Repeat this process with Point C & D, and E & F
If you find this too complicated (like me!) then get in touch with Jessamy from Handmade In Six Days who can repair them for you for a small fee for each nappy. Costs vary depending on the number of nappies & what needs to be done so just get in touch with Jessamy! This tutorial was written by her so thank you!
Thank you for this tutorial! I have two of these with the elastic gone that have been sitting around for a year, that I can now repair for use. Your nappies are great, I know these will have plenty of life left with new elastic 😊